Rufus USB is your go-to tool for whipping up bootable USB drives, whether you’re installing Windows, a Linux distro, or just need a handy recovery drive. It’s super easy to use, even for total tech newbies, and lets you create bootable drives from a variety of image files. This guide will walk you through everything you need to know, from basic usage to tackling tricky BIOS settings and troubleshooting those pesky errors.
We’ll cover the different image formats Rufus supports, the ins and outs of partition schemes (MBR vs. GPT), how to navigate Secure Boot, and even some advanced options you might not have known existed. Plus, we’ll tackle common problems and offer solutions, so you can become a Rufus pro in no time. Get ready to become a bootable USB master!
Rufus USB Functionality
Rufus is a lightweight, portable application designed to create bootable USB flash drives, essentially transforming your USB stick into a portable operating system installer. It’s incredibly useful for tasks like installing Windows, Linux distributions, or other bootable ISOs, bypassing the need for a DVD or an elaborate installation process. This makes it a popular choice for system administrators, tech enthusiasts, and anyone needing to quickly and easily create bootable media.Rufus’s core function is to format a USB drive and then write an ISO image file (the installer file for your chosen operating system) onto it, making the drive bootable.
This means your computer will boot from the USB drive instead of its internal hard drive, allowing you to install a new OS or run diagnostic tools. Beyond the basic functionality, Rufus also offers several advanced options, allowing users to customize the boot process and select specific boot parameters.
Operating Systems Supported by Rufus
Rufus boasts broad compatibility with various operating systems. It supports a wide range of Windows ISOs, including various versions from Windows XP to Windows 11. In addition to Windows, Rufus also works seamlessly with numerous Linux distributions, such as Ubuntu, Fedora, Linux Mint, and many others. The specific versions supported depend on the availability of the ISO image files themselves, but Rufus generally offers excellent compatibility with popular OS choices.
While macOS isn’t directly supported for creating bootable installersfrom* macOS, you can use Rufus on a Windows machine to create a bootable USB for macOS installation. This requires a Windows machine and a compatible macOS installer ISO.
Creating a Bootable USB Drive with Rufus: A Step-by-Step Guide
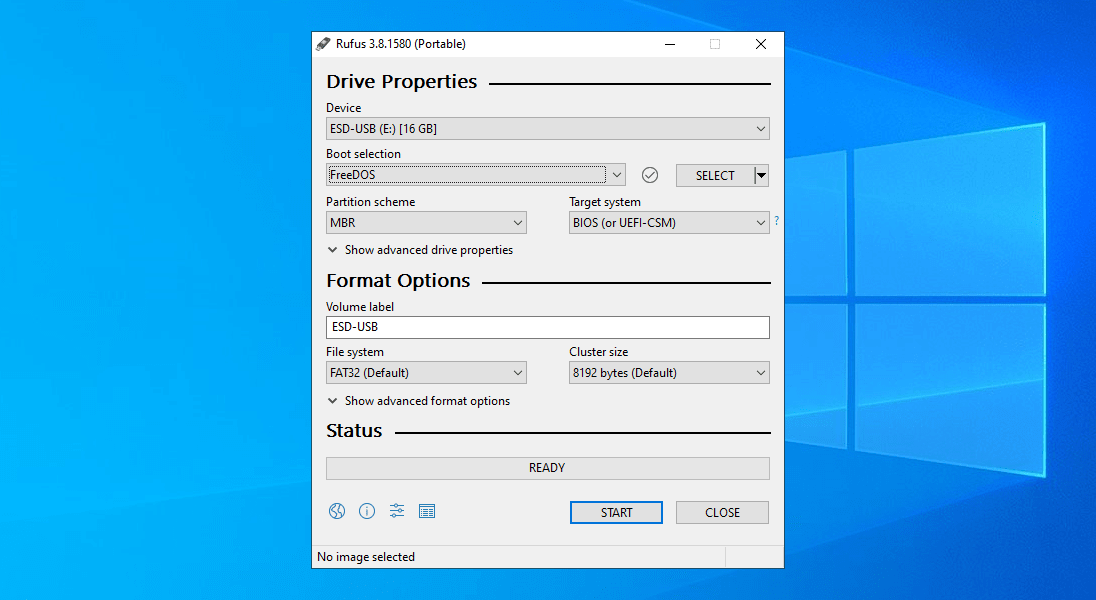
Creating a bootable USB drive using Rufus is straightforward. First, download and run the Rufus application. Next, select your USB drive from the device dropdown menu –carefully double-check this step to avoid accidentally overwriting data on the wrong drive*. Then, choose the ISO image file you wish to write to the USB drive. Rufus will automatically detect the file system needed, but you can manually select options like NTFS or FAT32 if desired.
You can also adjust additional settings like partition scheme and target system (BIOS or UEFI), depending on your computer’s specifications and the operating system you are installing. Finally, click the “START” button. Rufus will format the drive and write the ISO, completing the process in a matter of minutes, depending on the size of the ISO and the speed of your USB drive.
Remember to back up any important data on the USB drive before proceeding, as the process will erase all existing data.
Rufus Compared to Other USB Creation Tools
Several other tools offer similar functionality to Rufus, including UNetbootin, Universal USB Installer, and BalenaEtcher. While these tools share the common goal of creating bootable USB drives, Rufus stands out due to its speed, simplicity, and extensive OS compatibility. Other tools may require more steps or have a steeper learning curve. Rufus’s clean interface and straightforward process make it a preferred choice for many users.
The portability of Rufus, meaning it doesn’t require installation, is another key advantage. This allows for quick and easy use on any Windows machine without needing administrator privileges. The speed difference, while sometimes marginal, can be noticeable when working with large ISO files.
Rufus USB and BIOS Settings
Okay, so you’ve got your bootable USB drive created with Rufus – congrats! Now, the next hurdle is getting your computer to actually boot from it. This involves tweaking your BIOS settings, which can be a little tricky depending on your motherboard and its firmware. Different BIOSes look different, but the basic principles remain the same.Getting your computer to boot from a USB drive requires adjusting the boot order within your BIOS settings.
This essentially tells your computer which device to prioritize when starting up. If the USB drive isn’t listed first, your computer will likely try to boot from your hard drive instead.
BIOS Compatibility Issues
Not all BIOS versions play nicely with all bootable USB drives. Older BIOS versions might not recognize certain USB boot formats or might have limitations on the size of the bootable drive. You might encounter errors like “Boot device not found” or similar messages. Sometimes, even seemingly minor differences in the Rufus settings (like the partition scheme or target system) can cause compatibility problems with older BIOS versions.
For example, a UEFI-bootable drive created with GPT partitioning might not boot on a legacy BIOS system that expects MBR partitioning. This isn’t necessarily a Rufus issue, but rather a mismatch between the bootable media and the BIOS capabilities.
Troubleshooting BIOS Boot Failures
If your computer won’t boot from your Rufus-created USB drive, here’s a systematic approach to troubleshooting:First, double-check your Rufus settings. Ensure you selected the correct image file, partition scheme (MBR or GPT), and target system (BIOS or UEFI). A common mistake is selecting the wrong target system – if your system uses UEFI, youmust* select UEFI. Next, confirm that the USB drive is properly connected and recognized by your computer.
Restart your computer and enter the BIOS setup (usually by pressing Delete, F2, F10, F12, or Esc during startup – check your motherboard documentation for the correct key).Within the BIOS, navigate to the Boot section. Look for options like “Boot Order,” “Boot Priority,” or “Boot Device Priority.” Make sure your USB drive is listed at the top of the boot order.
Save the changes and exit the BIOS. Your computer should now boot from the USB drive. If it still doesn’t work, try a different USB port, a different USB drive, or even try recreating the bootable drive with Rufus using slightly different settings. Sometimes, a different USB drive or a slight alteration in the Rufus settings can resolve unexpected issues.
It’s also crucial to ensure your BIOS is updated to the latest version, as newer versions often include better support for modern boot methods.
Common BIOS Settings and Their Impact on Rufus USB Booting
| BIOS Setting | Description | Impact on Rufus USB Booting | Troubleshooting Tip |
|---|---|---|---|
| Boot Order | Specifies the order in which the computer attempts to boot from different devices. | The USB drive must be listed first for it to boot. | Ensure your USB drive is at the top of the boot order list. |
| Secure Boot | A security feature that verifies the authenticity of boot loaders. | May prevent booting if disabled, especially with non-Microsoft OSes. | Temporarily disable Secure Boot (if possible), boot from the USB drive, and then re-enable Secure Boot afterward. |
| UEFI/Legacy Boot | Determines whether the computer uses UEFI or Legacy BIOS boot mode. | Must match the settings used when creating the bootable drive in Rufus. | Ensure that the BIOS boot mode matches the “Target system” selected in Rufus (UEFI or BIOS). |
| CSM (Compatibility Support Module) | Allows older BIOS systems to boot UEFI devices. | May need to be enabled for legacy BIOS systems to boot UEFI-bootable drives. | Enable CSM if you’re using a UEFI bootable drive on a legacy BIOS system. (Note: this might not always be possible.) |
Rufus USB Image Formats
Rufus, a popular bootable USB drive creation tool, supports a variety of image formats, each with its own strengths and weaknesses. Choosing the right format depends on the specific needs of your project, considering factors like compatibility with your target system and the size of the image file. Let’s explore the most common formats supported by Rufus.
Different image formats offer varying levels of compatibility and efficiency. Understanding these differences is crucial for successfully creating a bootable USB drive.
Supported Image Formats and Their Characteristics
Rufus primarily supports ISO, IMG, and several other less common formats. ISO images are the most widely used and generally offer broad compatibility, while IMG files can be more specific to certain operating systems or distributions. The choice depends largely on the source of your bootable image.
ISO Images, Rufus usb
ISO images are the standard format for optical disc images. They contain a complete, bit-for-bit copy of a disc, including its file system and boot information. This makes them highly compatible with a wide range of systems and tools. The primary advantage is their near-universal compatibility; most systems and software designed to work with bootable media will readily accept an ISO image.
However, ISO images can be quite large, potentially requiring significant storage space, especially for larger operating systems.
IMG Images
IMG files are a more generic format, often used for disk images. Unlike ISO images which have a standard structure, IMG files can vary greatly in their structure and content, depending on how they were created. This flexibility can be both an advantage and a disadvantage. While IMG images can be smaller than ISO images in some cases, their compatibility is often less predictable.
You might find that certain systems or tools don’t support a particular type of IMG file. Their creation methods also vary considerably, making it crucial to understand the origin of the IMG file before attempting to use it with Rufus.
Comparison of Image Formats
| Format | Typical Size | Compatibility | Creation Methods |
|---|---|---|---|
| ISO | Large (several GBs for OS installations) | High; widely supported | Disc burning software, OS installers |
| IMG | Variable; can be smaller or larger than ISO | Variable; depends on the specific image | Many different tools and processes |
| Other (e.g., WIM, VHD) | Variable; depends on the specific image | Often limited; specific tools may be required | Specific to the operating system or application |
Rufus USB Drive Partition Schemes
So, you’re using Rufus to create a bootable USB drive, and you’re staring at the partition scheme options: MBR and GPT. Seems kinda intimidating, right? Don’t worry, we’ll break it down so you can confidently choose the right one for your needs. Basically, the partition scheme dictates how your computer organizes data on the drive, and the wrong choice can lead to booting issues.Choosing between MBR and GPT depends largely on your operating system and the size of your drive.
MBR (Master Boot Record) is an older standard, while GPT (GUID Partition Table) is newer and offers several advantages.
MBR Partition Scheme
MBR is a legacy standard that’s been around for ages. It’s simple, but it has limitations. The biggest is its support for only up to 2 terabytes (TB) of disk space. If you’re using a drive larger than 2TB, you’ll encounter problems if you select MBR. Furthermore, MBR only supports up to four primary partitions (or three primary partitions and one extended partition containing logical drives).
This limitation can be a real hassle for those who need to manage many partitions. While older systems and some legacy BIOS systems may only support MBR, modern systems usually support both MBR and GPT. Windows can use MBR, but GPT is generally preferred for newer systems.
GPT Partition Scheme
GPT is the modern standard, offering significant improvements over MBR. First and foremost, it supports disks larger than 2TB, a major advantage in today’s world of large storage devices. Second, GPT offers virtually unlimited partitions. This is particularly helpful for users who need to manage multiple operating systems or applications requiring dedicated partitions. Finally, GPT offers better data protection against corruption thanks to its redundancy features.
Most modern UEFI systems (the successor to BIOS) strongly favor GPT, and many newer operating systems like Windows 10 and later, and most Linux distributions, install using GPT by default.
Choosing Between MBR and GPT: Scenarios
Let’s look at some real-world examples to illustrate when each partition scheme is best.
- Scenario 1: Creating a bootable USB drive for an older system with a BIOS and a small hard drive (less than 2TB). In this case, MBR is the appropriate choice. The system likely won’t support GPT, and the drive size is within MBR’s limitations.
- Scenario 2: Installing Windows 11 on a new computer with a UEFI firmware and a large SSD. GPT is the clear winner here. Windows 11 requires UEFI, which strongly prefers GPT, and the large SSD benefits from GPT’s support for larger disk sizes and more partitions.
- Scenario 3: Creating a multi-boot USB drive with multiple operating systems. GPT is ideal for this situation. Its ability to handle many partitions allows for easy management of multiple OS installations on a single drive.
Decision-Making Flowchart for Partition Scheme Selection
Imagine a flowchart. It starts with a diamond: “Is your drive larger than 2TB?”. If yes, an arrow points to a rectangle: “Use GPT”. If no, an arrow points to another diamond: “Is your system using UEFI?”. If yes, an arrow points to a rectangle: “Use GPT (recommended)”.
If no (BIOS system), an arrow points to a rectangle: “Use MBR”. This simple flowchart summarizes the key considerations. Remember that while MBR might work on some newer systems, GPT offers superior flexibility and is the generally recommended choice for modern systems and larger drives.
Rufus USB and Secure Boot
Okay, so we’ve covered the basics of using Rufus to create bootable USB drives. But what happens when your system has Secure Boot enabled? This is where things can get a little tricky, because Secure Boot is a security feature designed to prevent malicious bootloaders from running. It essentially verifies the digital signature of the boot loader before allowing it to execute.
Since Rufus-created USBs often contain custom bootloaders, conflicts can arise.Secure Boot, working in conjunction with UEFI (Unified Extensible Firmware Interface), is a security protocol that verifies the digital signature of boot loaders and operating system kernels before loading them. This prevents unauthorized or malicious code from executing during the boot process. The interaction with Rufus is significant because Rufus creates bootable drives often bypassing this verification process.
If the boot loader on your Rufus USB drive doesn’t have a valid signature recognized by your system’s Secure Boot database, the system will refuse to boot from it.
Secure Boot Conflicts and Solutions
The primary conflict arises when a Rufus-created bootable USB drive lacks the necessary digital signature recognized by the Secure Boot system. This results in a boot failure, often displaying an error message indicating that the boot loader is not trusted. The solution depends on your needs and comfort level. One option is to create a bootable USB drive with a boot loader that has a pre-signed driver for your specific system.
However, this is not always readily available. A more common approach is to temporarily disable Secure Boot.
Methods to Temporarily Disable Secure Boot
Disabling Secure Boot is usually done through your computer’s BIOS or UEFI settings. The exact process varies depending on your motherboard manufacturer. Generally, you’ll need to access the BIOS/UEFI settings by pressing a specific key (often Delete, F2, F10, F12, or Esc) during the system startup. Once inside, look for options related to “Secure Boot,” “Boot,” or “Security.” You’ll typically find a setting to enable or disable Secure Boot.
Disable it, save the changes, and then try booting from your Rufus-created USB drive. Remember to re-enable Secure Boot after you’re finished using the USB drive to maintain the security of your system. This is crucial to protect your system from potential threats.
Troubleshooting Secure Boot-Related Boot Failures
If you’re still experiencing boot failures even after disabling Secure Boot, here are some troubleshooting steps:
- Verify BIOS/UEFI Settings: Double-check that Secure Boot is indeed disabled and that the boot order prioritizes your USB drive.
- Check USB Drive Functionality: Test the USB drive on another computer to ensure it’s not faulty.
- Re-create the Bootable Drive: Use Rufus to create a new bootable USB drive, ensuring you select the correct image and options.
- Update BIOS/UEFI Firmware: An outdated BIOS/UEFI firmware might have compatibility issues. Check your motherboard manufacturer’s website for updates.
- Check for BIOS/UEFI Compatibility: Ensure that your BIOS/UEFI version is compatible with the operating system you’re trying to boot from the USB drive. Some older systems may have limitations.
Rufus USB Error Handling

Okay, so you’re using Rufus to create a bootable USB drive, which is awesome, but sometimes things go sideways. Let’s talk about the common errors you might encounter and how to fix them. This isn’t rocket science, but a little troubleshooting can save you a lot of frustration.
Rufus, while generally reliable, can throw some error messages that might seem cryptic at first. Understanding the root causes of these errors is key to resolving them quickly. The good news is that most issues stem from relatively straightforward problems, and with a bit of detective work, you can usually get back on track.
Common Rufus Errors and Their Causes
Several factors can lead to errors during the Rufus process. These range from simple issues like incorrect ISO selection or drive letter confusion to more complex problems involving hardware compatibility or system settings. Below, we’ll Artikel some of the most frequent errors and explore their potential origins.
| Error Message (or Symptom) | Possible Cause(s) | Troubleshooting Steps | Additional Notes |
|---|---|---|---|
| “Error writing to disk” or similar | Faulty USB drive; insufficient disk space; drive write-protected; file system errors; insufficient permissions; corrupted ISO image; background processes interfering with the write operation. | Try a different USB drive. Ensure the drive has enough free space. Check if the drive is write-protected (often a physical switch on the drive itself). Run a disk check utility (like chkdsk in Windows). Run Rufus as administrator. Verify the ISO image’s integrity. Close unnecessary applications. | This is a very general error, so systematic troubleshooting is crucial. |
| “Image file is not a valid ISO image” | Incorrect file selected; corrupted ISO file; file extension mismatch. | Double-check the file you selected. Try downloading the ISO again from a trusted source. Ensure the file actually has the .iso extension. | Make sure you’re choosing the actual ISO file and not some other file with a similar name. |
| Rufus hangs or freezes | Insufficient system resources (RAM, processing power); background processes consuming resources; hardware issues (faulty USB port or drive). | Close unnecessary applications. Restart your computer. Try a different USB port. Try a different USB drive. Check your system’s RAM and CPU usage during the process using Task Manager (Windows) or Activity Monitor (macOS). | This can sometimes indicate a more serious hardware problem. |
| “Access Denied” error | Insufficient user permissions; antivirus software interference; file system locking. | Run Rufus as administrator. Temporarily disable your antivirus software. Check for any processes locking the target USB drive. | Remember to re-enable your antivirus software after the process is complete. |
| Boot failure after creating bootable USB | Incorrect BIOS settings; incompatible image file; corrupted USB drive; hardware issues. | Check BIOS settings to ensure the USB drive is prioritized in the boot order. Verify the ISO image is compatible with your system’s architecture (32-bit or 64-bit). Try creating the bootable USB again. Test the USB drive in another system. | This is often a BIOS configuration issue. |
Rufus USB and Different Hardware
Rufus generally boasts excellent compatibility with a wide range of USB drives, but understanding the nuances of hardware interaction can significantly impact your success. The performance you get from Rufus depends heavily on the drive’s specifications and the interplay between the drive, your system, and the chosen image. This section will explore these relationships to help you make informed choices.Choosing the right USB drive is crucial for a smooth Rufus experience.
Factors like the drive’s interface, capacity, and speed significantly influence the overall process, including write speeds and potential for errors. Using a compatible and high-quality drive is key to avoiding issues.
USB Drive Compatibility and Potential Issues
Rufus supports a vast majority of USB flash drives from various manufacturers like SanDisk, Kingston, Crucial, and others. However, some older or less common drive models might present compatibility challenges. Issues can range from slow write speeds to complete failure to format or write the image. In some cases, specific USB controller chipsets on the drive might have quirks that lead to incompatibility.
So, you’re using Rufus to create a bootable USB? That’s awesome! But if you ever need to completely nuke a program after using it to create the USB drive, you might want to check out revo uninstaller for a super thorough cleanup. It’s way better than just dragging things to the recycle bin. Then you can get back to using Rufus without any leftover junk files slowing things down.
For example, some drives using older USB 2.0 controllers may struggle with larger images or have significantly slower write speeds compared to USB 3.0 or 3.1 drives. Similarly, drives with faulty memory chips or damaged controllers will definitely fail to work properly. Troubleshooting typically involves trying a different USB port, a different USB drive, or updating the USB drivers on your system.
Best Practices for Selecting a USB Drive
Before using a USB drive with Rufus, it’s recommended to perform a quick check for any physical damage and verify its functionality. Ensure the drive is properly recognized by your system before attempting to use it with Rufus. Opt for reputable brands known for their reliability and quality. Avoid using drives that have been heavily used or show signs of wear and tear.
Consider using a new drive specifically for creating bootable USBs, to minimize the risk of data loss or corruption.
Recommended USB Drive Specifications
For optimal performance with Rufus, consider these specifications:
- Interface: USB 3.0 or 3.1 (USB 3.2 Gen 2×2 is even better, offering faster speeds) for significantly faster write speeds.
- Capacity: The required capacity depends on the size of the ISO image you intend to write. Always select a drive with sufficient capacity to comfortably accommodate the image and any additional files you might need.
- Type: Use a high-quality flash drive specifically designed for data storage. Avoid using slower or cheaper memory cards that are designed for other purposes.
- Read/Write Speed: Look for drives with high read and write speeds, especially the write speed, as this directly impacts how quickly Rufus creates the bootable drive. Higher speeds will translate to faster creation times.
Rufus USB and Data Security
Using Rufus to create bootable USB drives introduces several security considerations. While Rufus itself doesn’t inherently compromise data security, the process of creating and using bootable media presents vulnerabilities that require careful attention. Understanding these risks and implementing appropriate safeguards is crucial to protecting sensitive information.Data security when using Rufus hinges on understanding both the potential threats and the available mitigation strategies.
Improper handling can lead to data loss, unauthorized access, or the introduction of malware. The following sections detail methods for mitigating these risks.
Securely Erasing Data from a USB Drive Before Using Rufus
Before using a USB drive with Rufus, it’s essential to completely erase any pre-existing data. Simply deleting files isn’t sufficient, as data remnants can remain accessible using data recovery tools. Secure erasure methods overwrite the drive’s data multiple times, making recovery virtually impossible. Tools like DBAN (Darik’s Boot and Nuke) or the secure erase functionality within some operating systems offer reliable methods for achieving this.
Choosing a secure erase method ensures that any sensitive information on the drive is irretrievably removed before it’s repurposed. This is a critical step, especially if the drive previously contained confidential information.
Securely Erasing Data from a USB Drive After Using Rufus
After using a USB drive created with Rufus, securely erasing its contents is equally important. The bootable media might contain sensitive information, and even after use, data remnants could remain. Again, secure erasure tools are necessary to overwrite the data completely, preventing recovery. This step is vital to maintain data confidentiality and prevent unauthorized access to any information that may have been inadvertently stored on the drive during the bootable media creation or usage process.
Preventing Data Breaches When Using Rufus
Data breaches can occur at various stages when using Rufus. One key risk is using a compromised or infected system to create the bootable media. Malware on the host system could infect the USB drive during the process. To mitigate this, ensure the system used to create the bootable drive is clean and updated with the latest security patches.
Using a dedicated, trusted system specifically for this task significantly reduces the risk of infection. Additionally, verify the integrity of downloaded ISO images before using them to create bootable media. Checksum verification can help ensure the downloaded file hasn’t been tampered with.
Best Practices for Maintaining Data Security While Working with Rufus
Maintaining data security when working with Rufus involves a combination of proactive measures and careful practices. Always use strong passwords to protect your system and any sensitive data stored on it. Regularly update your operating system and antivirus software to address known vulnerabilities. Be cautious about downloading files from untrusted sources, as these could contain malware. Treat any bootable USB drive created with Rufus as potentially containing sensitive information, and always securely erase its contents after use.
Regularly backing up important data provides an additional layer of protection against data loss.
Rufus USB Advanced Options
Rufus offers a surprisingly robust set of advanced options beyond the basic settings. These options allow for fine-grained control over the bootable USB drive creation process, enabling customization for specific hardware, operating systems, and use cases. Understanding these options is crucial for creating bootable drives that function reliably and efficiently in diverse environments.
Advanced Options Overview
The advanced options in Rufus are tucked away but provide significant power. They let you tweak the creation process in ways that aren’t always obvious from the main interface. This section details each option, its impact, and when you might find it useful.
Image Options
This section focuses on choices related to the ISO image you’re using to create the bootable drive.
| Option | Function | Impact | Example Use Case |
|---|---|---|---|
| Write | Specifies how the image is written to the drive. | Different write methods offer varying levels of speed and data integrity. ISO images can be written in different ways, each impacting the speed and reliability of the process. | Using “Full” ensures a complete image write, which is preferable for critical operating system installations. “Quick” is faster but might leave some parts of the image unwritten. |
| Free Space Management | Controls how Rufus handles free space on the target drive. | This determines whether the remaining space on the drive after the image is written is left untouched, formatted, or wiped. | Selecting “Do not format” can be useful when you want to keep existing data on the drive outside of the image. “Format” provides a clean slate, and “Wipe” is for more thorough data sanitization. |
| Partition Scheme | Allows choosing between MBR and GPT partition schemes. | This impacts the drive’s compatibility with different BIOS/UEFI systems and the maximum disk size it can support. MBR is legacy, GPT is modern. | Use GPT for UEFI systems and disks larger than 2TB; MBR for older BIOS systems or specific legacy OS installations. |
| Target System | Specifies the target system (BIOS or UEFI). | This determines the boot loader used and the compatibility of the bootable drive. | Select “BIOS (or UEFI-CSM)” for older systems and “UEFI” for newer systems. Incorrect selection may result in boot failure. |
| File System | Specifies the file system for the bootable drive (FAT32, NTFS, exFAT). | This impacts compatibility with different operating systems and the maximum file size supported. | FAT32 is widely compatible but has a 4GB file size limit; NTFS is Windows-centric; exFAT is a good compromise with larger file support. |
| Cluster size | Specifies the size of clusters on the drive. | Smaller cluster sizes improve space efficiency for smaller files, but larger ones can be faster. | Smaller cluster sizes are generally preferred for storing many small files; larger ones are suitable for fewer, larger files. This has a minor impact on performance. |
| Quick Format | Enables a faster formatting process. | This speeds up the creation process but may not be as thorough as a full format. | Use this option to save time when speed is prioritized over a complete format. |
| Create a bootable disk using | Specifies the image type to use (ISO image, DD image, etc.). | This determines how the bootable drive is created. Different image types require different handling. | Use ISO for most common bootable media, like OS installers. DD images are for more advanced uses. |
Advanced Drive Options
These options control more low-level aspects of the USB drive creation.
| Option | Function | Impact | Example Use Case |
|---|---|---|---|
| Label | Sets the volume label of the USB drive. | This is the name displayed for the drive in file explorers. | Give the drive a descriptive name, like “Windows 10 Installer” or “Ubuntu 22.04.” |
| Show advanced options | Unveils the more detailed settings. | This allows access to more granular control over the drive creation process. | Use this to access options like “Partition Scheme,” “File System,” and “Cluster size”. |
| Format Options | Provides options for advanced formatting. | This can impact the drive’s speed, compatibility, and security. | This allows you to adjust settings like cluster size and quick format. |
Rufus USB for Specific Tasks
Rufus is a powerful and versatile tool for creating bootable USB drives, making it essential for various tasks beyond simply copying files. Its straightforward interface belies its capability to handle a wide range of scenarios, from basic system recovery to complex operating system installations. This section will detail how to leverage Rufus for several specific use cases.
Creating a Bootable USB Drive for System Recovery
System recovery often requires a bootable USB drive containing recovery tools or a system image. Using Rufus for this is straightforward. First, download your preferred recovery image (e.g., a manufacturer’s recovery ISO or a system image backup). Then, open Rufus, select your USB drive, choose the ISO image file, and click “Start.” Rufus will format the drive and write the recovery image, making it bootable.
Upon restarting your computer, enter the BIOS/UEFI settings to select the USB drive as the boot device. The specific steps to enter BIOS/UEFI settings and boot from a USB vary depending on the computer manufacturer and motherboard. Consult your computer’s documentation for detailed instructions. Remember to always back up important data before performing any system recovery operation.
Creating a Bootable USB Drive for Installing Different Linux Distributions
Installing a Linux distribution is often done via a bootable USB drive. The process with Rufus is similar to creating a recovery drive. Download the Linux distribution’s ISO file from the official website. Open Rufus, select your USB drive, choose the downloaded ISO, and click “Start.” Rufus will format the drive and create a bootable USB installer. Once the process is complete, boot your computer from the USB drive (again, check your computer’s documentation for BIOS/UEFI boot order settings).
Follow the on-screen instructions provided by the Linux installer to complete the installation. Different Linux distributions may have varying installation procedures, so familiarity with the specific distribution’s documentation is recommended.
Creating a Bootable USB Drive for Specific Software Installation
While less common than OS installation, some software requires a bootable USB for installation, particularly specialized utilities or low-level system tools. The process is fundamentally the same as creating a bootable Linux installer. Obtain the bootable ISO or IMG file for the software from its official source. Open Rufus, select the USB drive, choose the downloaded image file, and click “Start.” Once the process is complete, boot your computer from the USB drive.
The specific steps to install the software will depend on the software itself. Always verify the software’s legitimacy and source to avoid malware.
Creating a Bootable Windows Installation USB
Creating a bootable Windows installation USB using Rufus is a common and efficient method. Download the Windows ISO file from Microsoft’s official website. Open Rufus, select your USB drive, choose the downloaded Windows ISO, and click “Start.” Rufus will format the drive and prepare it for Windows installation. After the process completes, boot your computer from the USB drive and follow the Windows installation wizard.
Remember to have your Windows product key ready. During the installation, you will be prompted to choose your language, region, and keyboard layout, and then you’ll have the option to perform a clean install (erasing all data on the target drive) or an upgrade (preserving existing data). Always back up important data before starting a Windows installation, especially a clean install.
Closing Notes

Mastering Rufus USB opens up a world of possibilities for system maintenance, OS installation, and general tech tinkering. From creating simple bootable drives to navigating the complexities of BIOS settings and Secure Boot, this guide has armed you with the knowledge to confidently tackle any USB-related challenge. So, go forth and create! Remember to always back up your data, and happy booting!
Frequently Asked Questions
Can I use Rufus on a Mac?
Nope, Rufus is a Windows-only application.
What’s the difference between a bootable USB and a regular USB?
A bootable USB contains an operating system or other startup files that allow a computer to boot from the drive instead of its internal hard drive. A regular USB just stores files.
My Rufus USB isn’t working. What should I do?
First, double-check your BIOS settings to ensure that the computer is set to boot from the USB drive. If that doesn’t work, try a different USB drive or re-create the bootable drive. Check for any error messages during the Rufus process and search for solutions online.
How do I safely erase data from a USB drive before using Rufus?
Use a secure erase tool (many are available online) to completely wipe the drive before creating a bootable drive. This helps prevent data leakage.
How big of a USB drive do I need?
The required size depends on the operating system or image you’re using. Check the system requirements for the OS or image before selecting a USB drive.