DIY Golf Sim Enclosure: Imagine stepping into your own personal golfing oasis, a space where you can hone your swing year-round, regardless of weather. Building a DIY golf simulator enclosure is a rewarding project that can transform your home into a golfer’s paradise. This guide delves into the exciting world of creating your own custom golf simulator space, exploring the planning, construction, and technology integration required to achieve the ultimate golfing experience.
From choosing the right materials and framing techniques to incorporating cutting-edge technology, this comprehensive guide provides step-by-step instructions and expert advice to help you build a functional and visually appealing golf simulator enclosure. Whether you’re a seasoned golfer or a recreational enthusiast, this guide empowers you to create a dedicated space where you can enjoy the game you love, anytime, anywhere.
Framing and Construction
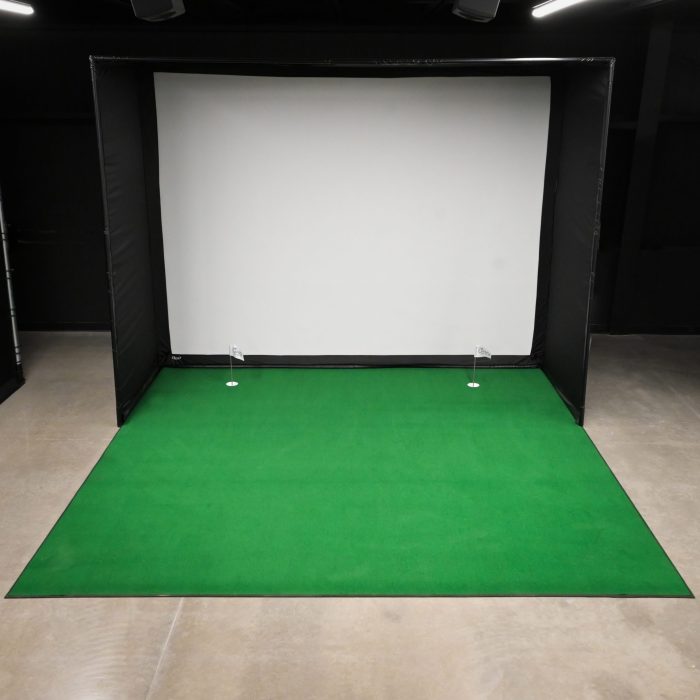
The framing of your golf simulator enclosure is a crucial step, dictating the structure’s strength, durability, and overall stability. Proper framing techniques are essential for achieving a robust enclosure that can withstand the rigors of repeated use and the weight of your simulator equipment.
Framing Techniques
Framing techniques for a golf simulator enclosure are similar to those used for traditional building construction. However, some adjustments are necessary to accommodate the specific needs of a golf simulator. Here are a few commonly used techniques:
- Wood Framing: This method is cost-effective and widely accessible, making it a popular choice for DIY projects. Wood framing involves using standard lumber like 2x4s or 2x6s to create a strong and rigid framework.
- Steel Framing: Steel framing offers exceptional strength and durability, making it ideal for larger enclosures or those requiring heavy-duty support. Steel framing is also fire-resistant and less susceptible to moisture damage than wood.
- Hybrid Framing: Combining wood and steel framing can leverage the advantages of both materials. For instance, using steel for the main structural components and wood for interior walls can create a balanced and cost-effective framework.
Stability and Durability
Achieving stability and durability in your golf simulator enclosure requires careful planning and execution:
- Proper Joinery: Use strong joints like mortise-and-tenon, pocket holes, or reinforced corner brackets to connect framing members. Avoid weak joints that can compromise the structure’s stability.
- Wall and Ceiling Support: Ensure adequate support for walls and ceilings by using strategically placed studs, beams, or joists. This is particularly important if you have a heavy simulator or plan to install a projector or other equipment on the ceiling.
- Foundation: A solid foundation is essential for long-term stability. Consider a concrete slab or a well-constructed wooden platform to provide a stable base for your enclosure.
Ventilation and Soundproofing
Ventilation and soundproofing are crucial considerations for creating a comfortable and functional golf simulator environment:
- Ventilation: Adequate ventilation is necessary to prevent moisture buildup and ensure proper airflow. Install vents or windows to allow fresh air to circulate and remove any heat generated by equipment.
- Soundproofing: Soundproofing helps reduce noise from the simulator and outside distractions. Use sound-absorbing materials like acoustic panels, insulation, or even thick curtains to minimize noise levels.
Soundproofing and Climate Control: Diy Golf Sim Enclosure
Creating a dedicated golf simulator enclosure is a great way to enjoy the game year-round, regardless of weather conditions. However, the enjoyment can be significantly impacted by noise and temperature fluctuations. To ensure a truly immersive and comfortable golfing experience, addressing soundproofing and climate control is essential.
Soundproofing
Soundproofing is crucial for minimizing noise transmission, both from the simulator to the surrounding environment and vice versa. It allows you to enjoy the game without disturbing others and prevents external noises from interfering with your swing.
- Insulation: Adding insulation to the walls, ceiling, and floor of your enclosure can significantly reduce noise transmission. Common insulation materials include fiberglass batts, mineral wool, and foam panels. Insulation works by absorbing sound waves, preventing them from traveling through the structure.
- Acoustic Panels: Acoustic panels are specialized panels designed to absorb sound energy. They are often made from materials like foam, fiberglass, or mineral wool, and come in various shapes and sizes. Installing acoustic panels on walls and ceilings can effectively reduce echoes and reverberation, creating a quieter and more immersive environment.
- Sound-Dampening Materials: Using sound-dampening materials like carpets, curtains, and rugs can help absorb sound and reduce noise levels. These materials can be strategically placed throughout the enclosure to create a more acoustically pleasing environment.
- Door and Window Sealing: Sealing gaps around doors and windows is essential for preventing sound leakage. Weather stripping, door sweeps, and window seals can be used to create a tight seal, reducing noise transmission.
Climate Control, Diy golf sim enclosure
Maintaining a comfortable temperature and humidity level is crucial for a pleasant golfing experience.
- Heating and Cooling Systems: A dedicated HVAC system designed for the enclosure is the most effective way to control temperature and humidity. This could include a mini-split system, a heat pump, or a traditional furnace and air conditioner. The system should be sized appropriately for the enclosure’s volume to ensure efficient heating and cooling.
- Ceiling Fans: Ceiling fans can help circulate air and create a more comfortable environment, especially during warmer months.
- Dehumidifiers: In humid climates, a dehumidifier can help remove excess moisture from the air, preventing condensation and mold growth.
Technology Integration
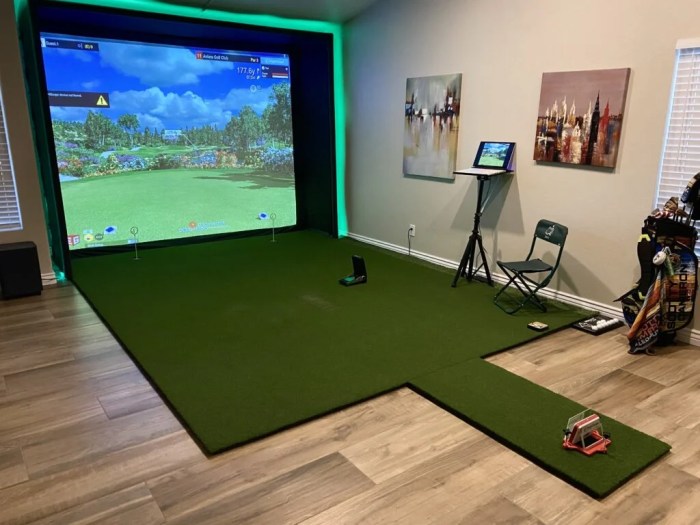
The heart of your DIY golf simulator enclosure lies in the technology that brings the experience to life. This section focuses on integrating the essential components, such as the golf simulator, projector, and other technologies, for an immersive and enjoyable golfing experience. It also provides guidance on setting up and configuring the technology for optimal performance, along with tips for troubleshooting common technical issues.
Simulator Setup and Configuration
The simulator is the core component of your golf sim setup. It captures your swing data and generates a realistic simulation of your shot on a virtual course.
- Choosing the Right Simulator: Select a simulator that aligns with your budget and desired features. Factors to consider include:
- Swing Analysis: Advanced simulators offer detailed swing data analysis, providing insights to improve your game.
- Course Library: A vast course library provides variety and keeps your experience fresh.
- Multiplayer Capabilities: Some simulators allow you to play against friends or online opponents, enhancing the social aspect of your golf sim.
- Installation and Calibration: Follow the manufacturer’s instructions for installing the simulator. Calibration is crucial for accurate swing data capture. This typically involves adjusting the sensor’s position and orientation.
- Software Updates: Regularly check for software updates to ensure optimal performance and access new features.
Projector Setup and Configuration
The projector displays the virtual course onto your hitting screen, creating the immersive golf experience.
- Projector Selection: Choose a projector with high resolution, brightness, and contrast for a clear and vibrant image. Consider factors like throw distance and screen size.
- Screen Installation: Install the screen at the appropriate distance from the projector to achieve the desired image size. Ensure the screen is positioned perpendicular to the projector.
- Projector Calibration: Calibrate the projector to ensure accurate color and image alignment.
- Projector Mounting: Mount the projector securely, considering ceiling height and the desired projection angle.
Other Technologies
Beyond the simulator and projector, additional technologies can enhance your golf sim experience.
- Audio System: Integrate a surround sound system for immersive audio.
- Lighting: Install dimmable lighting to create the desired atmosphere.
- Climate Control: Ensure adequate ventilation and temperature control for optimal comfort.
Troubleshooting Technical Issues
While setting up and configuring your golf sim is straightforward, you may encounter some technical issues.
- Swing Data Errors: Check the simulator’s calibration, ensure the sensor is not obstructed, and verify that the software is up-to-date.
- Projector Issues: Ensure the projector is connected to the simulator and power source. Check the lamp life and lamp settings.
- Network Connectivity: Verify your internet connection and ensure the simulator is connected to the network.
Finishing Touches and Personalization
The foundation of your DIY golf sim enclosure is complete, but now it’s time to bring your vision to life. This is where the fun truly begins, transforming your space into a personalized haven for your golfing passion.
Adding finishing touches and personalizing your golf sim enclosure allows you to create a unique and functional space that reflects your style and enhances your gaming experience.
Decorations
Decorations play a crucial role in creating a distinct ambiance within your golf sim enclosure. They can transform a simple space into a captivating and inspiring environment.
- Themed Decor: Consider your favorite golf courses, players, or moments in the sport. You could display framed photographs of iconic courses, vintage golf posters, or even a collection of signed golf balls.
- Wall Murals: Create a realistic backdrop using wall murals depicting scenic golf courses or dramatic landscapes. You can find high-quality, customizable murals online or through local print shops.
- Lighting: Proper lighting is essential for setting the mood and enhancing the visual experience. Install dimmable LED lights to create a cozy and inviting atmosphere, or consider using spotlights to highlight specific features.
Storage Solutions
Storage solutions are crucial for maintaining a clean and organized space, ensuring everything has its place.
- Shelving: Install shelves to display golf equipment, memorabilia, and accessories. You can choose from a variety of materials, such as wood, metal, or acrylic, to match your enclosure’s design.
- Cabinets: For larger items or sensitive electronics, consider using cabinets with locking mechanisms to ensure security and protection.
- Drawers: Built-in drawers can provide a convenient way to store smaller items like golf balls, tees, and cleaning supplies.
Accessories
Adding accessories can elevate the functionality and comfort of your golf sim enclosure.
- Comfortable Seating: Invest in comfortable chairs or a plush sofa to ensure a relaxed and enjoyable gaming experience.
- Sound System: Immerse yourself in the sounds of the game with a high-quality sound system. Consider surround sound speakers for a truly immersive experience.
- Mini-Fridge: A mini-fridge is a practical addition for storing drinks and snacks, keeping you refreshed during extended gaming sessions.
Building a DIY golf sim enclosure is a project that combines creativity, technical skill, and a passion for the game. By following the guidelines Artikeld in this guide, you can create a personalized and functional space that elevates your golfing experience to new heights. Whether you’re looking to improve your swing, enjoy a round with friends, or simply escape into the world of golf, a DIY golf sim enclosure offers a unique and rewarding opportunity to fulfill your golfing dreams.
Building a DIY golf simulator enclosure is a great way to enjoy the game year-round. You can personalize the space with your favorite team logos or designs using DIY custom patches , which add a unique touch to your golf sim. Whether you’re a seasoned golfer or just starting out, a personalized enclosure can enhance your practice sessions and create a fun atmosphere.

